September 2001
Post SVA - Week 3
Harnesses arrived much sooner than expected. Fitted the passenger side harness - went straight on. Just a matter of unbolting
the old 3-point static belt and bolting the Luke harness on in its place. Started to do the driver's side one and hit a snag.
The captive nut in the tunnel for the harness is, erm, not very well. It's chewed up two bolts now (the second one took a lump
hammer and crowbar to remove). So I'm going to have to come up with another secure fixing for that bolt.
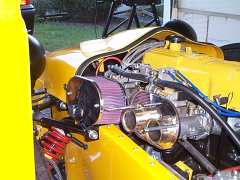 Pulled the K&N air filters out the box. Looks easy enough to fit. Drill two hole to mount the trumpets on each barrel, a big
hole for the barrel itself and a pair of holes to mount the through-bolts that hold it all together. Only it's stainless steel,
and my holesaws won't touch it. So I'm reduced to drilling a series of little holes around the edge and filing out to make the
larger holes. The offset on the filters so they clear the chassis rail is quite significant. In fact so significant I ended up
with the trumpets virtually touching the filter element at the bottom, and problems finding somewhere suitable to mount the two
through-bolts on each filter. Got there in the end with some careful measurement and a bit of experimentation with a cardboard
template. If anyone else is doing the same thing, I kept a copy of my final templates which you can have a copy of..... :-)
Pulled the K&N air filters out the box. Looks easy enough to fit. Drill two hole to mount the trumpets on each barrel, a big
hole for the barrel itself and a pair of holes to mount the through-bolts that hold it all together. Only it's stainless steel,
and my holesaws won't touch it. So I'm reduced to drilling a series of little holes around the edge and filing out to make the
larger holes. The offset on the filters so they clear the chassis rail is quite significant. In fact so significant I ended up
with the trumpets virtually touching the filter element at the bottom, and problems finding somewhere suitable to mount the two
through-bolts on each filter. Got there in the end with some careful measurement and a bit of experimentation with a cardboard
template. If anyone else is doing the same thing, I kept a copy of my final templates which you can have a copy of..... :-)
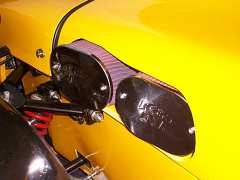
 Then had to open up the four little holes in the bonnet to fit these whopping great filters through. Took ages (trying to cut
a little at a time so I didn't end up with an oversize hole). Gave up when it came to dinner time...
Then had to open up the four little holes in the bonnet to fit these whopping great filters through. Took ages (trying to cut
a little at a time so I didn't end up with an oversize hole). Gave up when it came to dinner time...
Neil took my cycle wings up to Tiger for them to have a look at. They've agreed the quality is well below par and will replace
them when they can get some made up. I've got them back for now so I don't have the car off the road while I wait...
Post SVA - Week 4
Got a high-tensile M12x50 bolt and aero locking nut from a local fastener specialist, which I'll use for the replacement harness
fixing. Not tonight though - starting a welding class.... :-)
Or maybe tomorrow - spent the whole evening staring at the telly in horror at what's just happened in New York and Washington....
Later that week: had to buy another drill, as the one I had was too large to get in to drill through the captive nut. What I've
done is put the harness on with the M12 bolt going through what used to be the captive nut into a proper locking nut inside the tunnel.
It's very solid and secure, which is what you want on a harness fixing really..... :-) So both harnesses are properly fitted now,
and look and feel great ;-)
Post SVA - Week 5
 Not much during the week - too busy. Finished up the hole around the air filters.
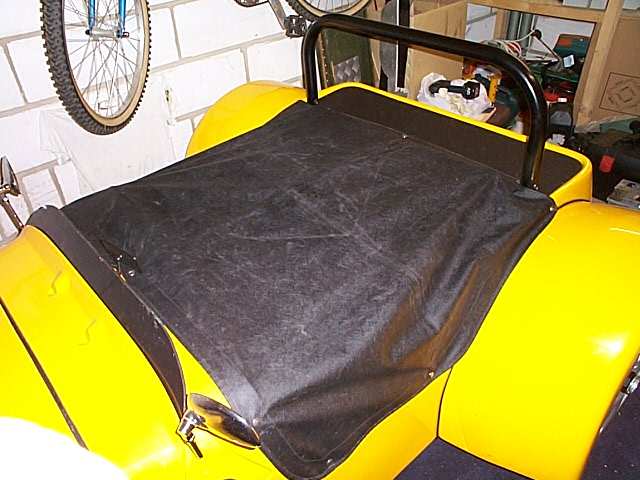
Busy weekend, cut some 6mm plywood to fit the hole at the back where the boot should be, trimmed with exterior grade vinyl and
(temporarily) screwed into position. Also rivetted the poppers onto the car to hold the tonneau on, and added a few extra to hold
the tonneau taut onto the boot lid.
The nose came off, and I drained the cooling system. Two reasons for doing this, the first was a leak from around the core
plug at the rear of the head. The second was the close proximity of the alternator to exhaust (c. 2mm) which I wasn't happy with,
but involved putting a cut'n'shut thermostat housing on to allow clearance for the fan belt..... So the core plug was pulled out,
with the aid of a hammer, chisel and crowbar. This revealed that it had corroded through the centre into a 3mm round hole. Entirely
consistent with a 14 yr old engine, but not with one which I've just paid to have rebuilt..... :-( Still, at least I now know the
core plugs could be suspect in future. The thermostat housing was swapped over, and I now have a lot more room to move the alternator
up. Unfortunately, I don't have a longer belt, and the adjustable bracket which holds the alternator isn't long enough to hold the
alternator there. So I now have a test piece for my next welding class. As an aside, the cut'n'shut thermo housing was no longer
large enough inside to accomodate a thermostat, so I used the inline housing from a Rover 216. This had an 88degC thermostat in,
but Halfords kindly supplied an 82degC one, which I believe was used in the 214 in the early 90's. It's all back together now, but
until I get the bracket lengthened I can't run it up and bleed the cooling system, as I don't have an alternator..... BTW, many
thanks to Keith Banthorpe for passing on the cut'n'shut Pinto thermostat housing, Rover remote housing and a bunch of hoses (as
originally fitted to Neil Wain's Six), and I hope my standard setup neatens your engine bay up!
Made a few more alterations to the shape of my wooden template aeroscreen, and cut the final-ish one out of the black polypropelene
I'm going to use. Now just need to shape the uprights to vaguely match the scuttle and cut them to length in order to secure the
ends of the screen. Also cut a couple of piece of carbon fibre from a spare sheet previously used by Neil Wain and Ian Martin, to
give me a pair of kick plates to prevent shoes from scratching the tub when people climb in. Just need a little trim to tidy the
edges off then I'll fix 'em on.
Not bad for a weekend, eh?
Post SVA - Week 6
Getting my welding teacher to extend the bracket for me (hehehe.....) so it's just a matter of putting it back on, fixing the
alternator in place and filling and bleeding the cooling system then I'll be back on the road (after far too long.....) The
SATOC meeting is tomorrow evening, so I'd best get onto it - shame it's pouring down and
the forecast for tomorrow isn't much better......
Didn't get anywhere, went to the meeting in the tintop.
Neil and I have been talking lots about uprated rollbars, and Neil now has the materials required to make his. His tame welder
should be coming round to do the first bit in the next few days, so he can finish shaping the ends of the tube to fit properly.
Then weld it all in place and have it powder-coated. Mine will closely follow. It's a fairly agricultural solution, but it's
well up to the forces which could be placed on it, and I'd rather have it than what's on there at the moment (i.e. as good as nothing).
I'll elaborate much more next week, when I can hopefully get some pics and I'll have more time to go into detail!
Weekend of cars and beer on the cards - swapping in an engine on a Mk1 'scort, followed by an old Ford show.
Last Updated 26Sep01
© Andy McMinn