May 2001
Week 51
Too busy to spend time on car, got the fleeces back and spent ages sorting them out. Looks mighty fine. Worked
out everyone's refunds too - it's going to be painful paying out that much money!!!!
Stoneleigh weekend. Camped over from Saturday until Monday, along with a good sized group of Tiger owners on the
Tiger pitch. Much beer, wine, food and general p*ss-taking.... Sunday saw around 55 Tigers parked up on the pitch
and a great deal of interest from prospective builders, as well as an awful lot of Tiger list people. Monday was
less busy, but still good fun and gave me a chance to get a proper look around the show. Handed out most of the fleeces
over the weekend, many more than I expected, which lightened the load on the way home. We left around 4pm in the
misfiring Saab (hopefully just a dodgy spark plug). Must get round to adding the little bits I bought at Detling
and Stoneleigh to the costs page. Thankfully nothing too big, most expensive was the Tiger chrome stalk mirrors
at 30 quid for the pair. I'll try and get some pictures up too.
Week 52
One year anniversary of picking up the kit. I reckoned I could have it done by Christmas (9 months), and 12 months
on I've still got another couple of months to go. Still, it'll all be worth it in the end, and I'll have the confidence
of knowing I haven't cut any corners on the way.
Cut down a piece of hefty sheet metal to reinforce the battery tray for the battery and expansion tank to be attached
to. Would've been better to use a thicker piece of sheet in the first place, but unfortunately it's too late as the
existing sheet is attached between the tub and chassis at the edge so can't be removed. Still, it'll do the job...
Fixed the intermittent tachometer problem. Turns out the electronic ignition input to the tacho I was using (with
my electronic box & breakerless dizzy) was the wrong input. It had to be connected to the points input. Obviously.
Greengauges help pages didn't help here. Also went some way towards fixing my upside down fuel gauge problem - basically
the gauge reads full when the tank's empty and empty when the tank's full, due to incompatible sender and gauge. Made
an "adjustment" to the sender by bending the float arm back on itself so it reads the other way up. Only problem now is
that it appears not to use a linear scale. I put 1.5 gallons in, and the gauge reads 1/3 full. Now I know the tank's
small, but that's a little excessive....... ;-)
Week 53
 And indeed it did do the job. Expansion tank is now solidly mounted and filled. So, I started the engine up again.
I got rather worried when it stalled 15 seconds later, only after almost giving up did I realise I'd previously unplugged
the fuel pump to stop it running when I had the ignition on to check some electrics.... Ran the engine up to temperature,
where it sat at an indicated 80-85degrees. Bled the system, using the bleed valve which was brazed onto the top of the
radiator by a local radiator firm. The fan cuts in occasionally, then out again, so I'm happy that works well (unlike
Ian Martin, whose Cat has a fan which comes on while he's driving along and stays on for 10 minutes after switching off -
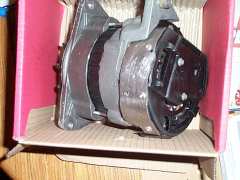
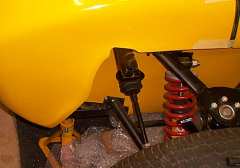
dodgy switch, most likely). Biggest problem I had was the plastic rear cover on the alternator almost catching fire,
due to the heat from the exhaust header right next to it. After cooling it off with a carefully aimed jet of water, I
took it off, and you can see what's happened to it below. By the way, the water on the ground under the car is
just from bleeding the rad.
And indeed it did do the job. Expansion tank is now solidly mounted and filled. So, I started the engine up again.
I got rather worried when it stalled 15 seconds later, only after almost giving up did I realise I'd previously unplugged
the fuel pump to stop it running when I had the ignition on to check some electrics.... Ran the engine up to temperature,
where it sat at an indicated 80-85degrees. Bled the system, using the bleed valve which was brazed onto the top of the
radiator by a local radiator firm. The fan cuts in occasionally, then out again, so I'm happy that works well (unlike
Ian Martin, whose Cat has a fan which comes on while he's driving along and stays on for 10 minutes after switching off -
dodgy switch, most likely). Biggest problem I had was the plastic rear cover on the alternator almost catching fire,
due to the heat from the exhaust header right next to it. After cooling it off with a carefully aimed jet of water, I
took it off, and you can see what's happened to it below. By the way, the water on the ground under the car is
just from bleeding the rad.
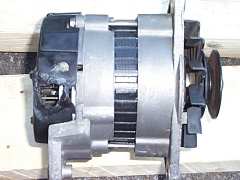
Can't remember if I mentioned that the charge warning light was permanently on (even before I melted the alternator
rear cover). Checked it while running, and sure enough, the voltage between the battery terminals was 12.4v, where it
should be nearer 14v when the engine's running. Which means nothing coming out of the alternator. Checked the wiring.
Checked it again. Added an earth strap in case the painted bracket was affecting the path to earth through the case of
the alternator. Still no joy. Took it off and back to the place that supplied it. They diagnosed a dead regulator
(not good news, especially since they supplied it to me "new" - it appears that a loose contact inside was floating around
and shorted on something, killing the reg). In replacing it, they snapped a through bolt and had to strip the unit down
and rebuild it. At least they had the decency not to try and charge me. Needless to say, I won't be going back there
again.
Good day's work on Sunday. Finally fitted the exhaust 4-1 collector, using translucent silicone sealant (which comes
highly recommended as an ideal flexible exhaust sealant - rather than the brittle paste usually used which dries and
falls out). The bracket which supports the rear of the silencer is bent, holes made to house the rubber mounts for the
silencer and also hold it to the chassis with a pair of long M8 bolts (it's a real pain getting the car high enough to
get a drill in from underneath to make the mounting holes - had it on 4 axle stands on top setting and still wasn't high
enough. Ended up drilling them while the car was sitting on just the jack with two thick blocks of wood to get it up
higher.....) So now I'm just waiting for the paint to dry before I finally fit the back of the exhaust. Also took the
final opportunity to polish out the gouges in the tub which I made by being clumsy while cutting the exhaust hole
(wet 800, wet 1500, rubbing compound). Also rivetted down the tub around the rear arches (up the vertical and along the
diagonal) which has made it all much more solid. Only remaining place to be secured is right at the back by the spare
wheel carrier, but I'm considering cutting it off the car so I'll leave it until I know exactly what I'm going to do there.
Week 54
Fitted the silencer and bracket, plenty of sealant on the silencer-collector joint. Got a really nice stainless steel
clamp to hold them together from Mr Fastner courtesy of Paul Swarbrick (fellow Six
builder - just passed SVA and awaiting registration).
Also been deciding on what exactly to do for wheels. The final choice was TSW Fury 7x16", fitted with Yokohama A539 in 205/45VR16,
from George Polley Motorsport. I've pulled the studs out of the halfshafts and
refitted them in the Tiger drilled VW holes (PCD 100/4). So all the wheels have the same holes, the only difference from front to
back is the diameter of the centre spigot (57mm for VW, 63mm for Ford). Unfortunately, the wheels aren't available with an offset
of ET22 which is what Tiger specify for the wheels, so I'm getting ET35 and some 10mm spacers to alter the offset to ET25 (close
enough). Because of the spacers I'm having to put longer studs in all round, so I'll have to pull the short ones out of the
VW holes and replace them before I can put it all together finally. I'm only getting four wheels for now. Don't really want to
pay for a spare which I never use, have to carry a jack and wheel brace round all the time etc. Only question left is what to
do with the spare wheel carrier on the chassis.....
I've finally updated the costs page now, should be totally up to date. It's getting rather too close to £9,000 now..... 8-o
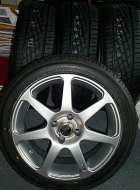 The wheels arrived, and were fitted (briefly, don't want to damage them while I'm still working around the car). They look
lovely, and fit fine.
The wheels arrived, and were fitted (briefly, don't want to damage them while I'm still working around the car). They look
lovely, and fit fine.
Week 55
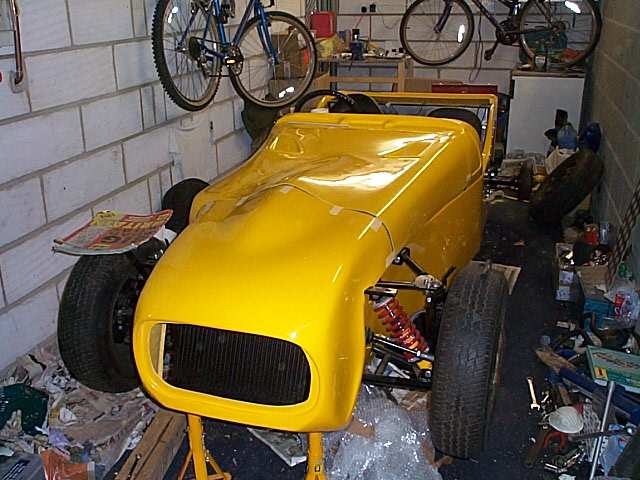
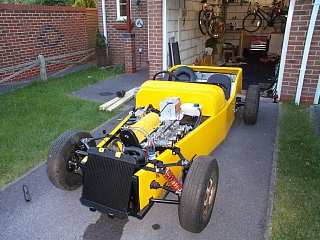
Fitted the bonnet and nose. This was a bit of long, slow job, as expected. Not something I was looking forward to at all, far
too visible and easy to make a cock-up. I had bolted down the scuttle in place (front edge 260mm back from the front of the
battery tray front member), and held the trim on the bonnet inset with masking tape, to ensure the bonnet would sit in the right
spot. With the front end of the bonnet supported by a couple of bits of card over the chassis, the bonnet was put in place, and
I saw the rather large gap in the centre on top. I trimmed the sides of the bonnet down by 5-8mm (gradually, in quite a few
stages) and filed it smooth. This had it looking pretty close. It's worth noting that you're not after a straight edge to the
bonnet, as the inset in the scuttle for the bonnet is curved.....
 Then came the tricky bit - the nose. Getting this right is tough because you've got to cut a piece out of the sloping rear
edge of the nose in order for it to sit nicely over the headlamp brackets. So you start by sitting the flange on the bottom edge
of the nose underneath its mountings on the chassis, then rocking the nose over to find out where you need to start cutting. I
chopped a few mm off around and slightly in front of this point, and then got into a fit, mark where needs to be opened up, file,
refit.... cycle. It took me around 12 or 13 iterations to get to the stage where I was reasonably happy with it. You're aiming
to have the flatish underside of the top of the nose roughly in line with the chassis on both sides. Once you've got this, you
can try getting the bonnet to sit neatly on it at the same time as the scuttle. So I taped the trim onto the bonnet inset on the
nose and put it all together. I had to chop a little off the flange at the bottom of the nose to allow it to move towards the
rear of the car, but it all looks good. I took the corners off the underside of the bonnet so it doesn't catch on the edge of the
nose when put it on or take it off, and generally neatened the edges of everything off. But that's it. And doesn't it look good
(panel gaps are rather good when everything's held together - as it will be once the bonnet clips are fitted and I've made some
brackets to support the rear of the nose). Thanks to Paul Swarbrick for providing tips on how to not make a mess of it. The
main one is: TAKE IT SLOWLY!!!!
Then came the tricky bit - the nose. Getting this right is tough because you've got to cut a piece out of the sloping rear
edge of the nose in order for it to sit nicely over the headlamp brackets. So you start by sitting the flange on the bottom edge
of the nose underneath its mountings on the chassis, then rocking the nose over to find out where you need to start cutting. I
chopped a few mm off around and slightly in front of this point, and then got into a fit, mark where needs to be opened up, file,
refit.... cycle. It took me around 12 or 13 iterations to get to the stage where I was reasonably happy with it. You're aiming
to have the flatish underside of the top of the nose roughly in line with the chassis on both sides. Once you've got this, you
can try getting the bonnet to sit neatly on it at the same time as the scuttle. So I taped the trim onto the bonnet inset on the
nose and put it all together. I had to chop a little off the flange at the bottom of the nose to allow it to move towards the
rear of the car, but it all looks good. I took the corners off the underside of the bonnet so it doesn't catch on the edge of the
nose when put it on or take it off, and generally neatened the edges of everything off. But that's it. And doesn't it look good
(panel gaps are rather good when everything's held together - as it will be once the bonnet clips are fitted and I've made some
brackets to support the rear of the nose). Thanks to Paul Swarbrick for providing tips on how to not make a mess of it. The
main one is: TAKE IT SLOWLY!!!!