January 2001
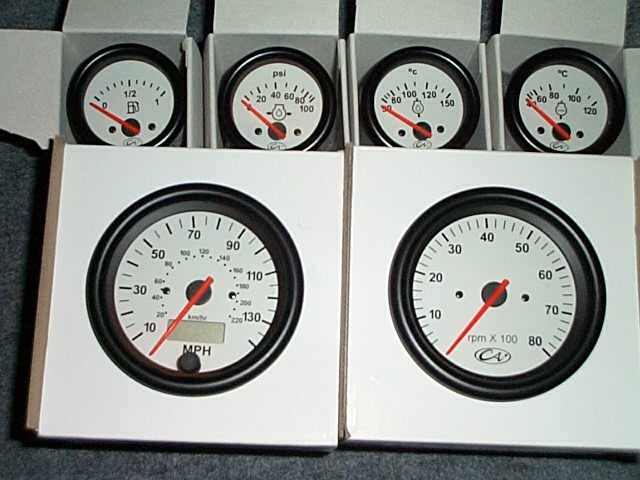
 The LSD and gauges arrived. The dials look great, just how I wanted. They forgot to put the
thread adaptors in for the temperature and pressure senders, but they've posted them on now.
All I've got to do now is decide on the dash layout and get building. I'm not going to use the
Tiger plywood template, I fancy something a little different with a centre console, which gives
enough space to move all the dials and switches closer to the driver. I'm going to take piccies
of the dash and dials and try out some layouts before I start cutting GRP and plywood. I'll put
them up here when I've had a go.
The LSD and gauges arrived. The dials look great, just how I wanted. They forgot to put the
thread adaptors in for the temperature and pressure senders, but they've posted them on now.
All I've got to do now is decide on the dash layout and get building. I'm not going to use the
Tiger plywood template, I fancy something a little different with a centre console, which gives
enough space to move all the dials and switches closer to the driver. I'm going to take piccies
of the dash and dials and try out some layouts before I start cutting GRP and plywood. I'll put
them up here when I've had a go.
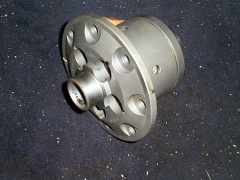
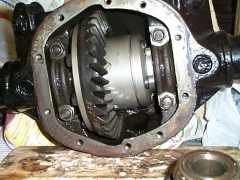
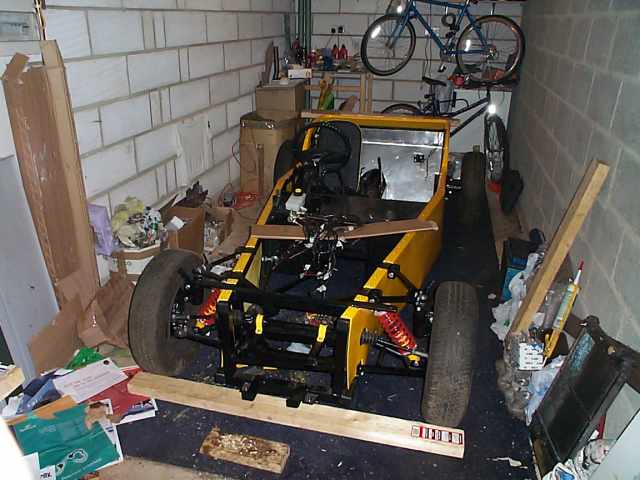
It took almost 3 hours to get the axle out. It's a tight fit in there once the tank's fitted, and the tub's on. We ended up with a bizarre sequence of twisting, pulling and turning, with a bit of shouting and swearing thrown in for good measures. But it's done now, axle's sitting on the floor drained of oil (before we took it out) with the diff backplate off. The halfshafts came out pretty easily (surprisingly!) using the bolts-through-the-wrong-way-pushing-the-shaft-out method. Now all that remains is to undo the bearing caps and pull the carrier out.
 Or so you'd think. It's completely solid. With the caps off there's absolutely no movement in
the carrier. It appears the bearing outers have seized onto the diff casing and don't want to let
go. Liberal BFI (brute force & ignorance) hasn't shifted it yet. Maybe I just need a bigger tool
to do the job... (oo-err...) I've got a suitable crowbar, which is going to be used in the next
assault....
Or so you'd think. It's completely solid. With the caps off there's absolutely no movement in
the carrier. It appears the bearing outers have seized onto the diff casing and don't want to let
go. Liberal BFI (brute force & ignorance) hasn't shifted it yet. Maybe I just need a bigger tool
to do the job... (oo-err...) I've got a suitable crowbar, which is going to be used in the next
assault....
 Scrapyard visit on Saturday went well. Got another gearbox (this time with speedo sender
included, so I now have two... as well as the rubber doughnut and fitting from the backend of the
box, which will hopefully serve to stop the oil from pouring out the output shaft hole when the
thing's lowered into the car. Also got a radiator fan, dizzy + amp (not coil tho'), block breather,
some bellhousing bolts, horn, thermostat housing, cambelt cover (which I may or may not use) and
more hoses than you can shake a stick at. Bought a new clutch release arm boot & clip from the
dealer too - I don't want oil and dirt getting into the bellhousing once it's all together.
Scrapyard visit on Saturday went well. Got another gearbox (this time with speedo sender
included, so I now have two... as well as the rubber doughnut and fitting from the backend of the
box, which will hopefully serve to stop the oil from pouring out the output shaft hole when the
thing's lowered into the car. Also got a radiator fan, dizzy + amp (not coil tho'), block breather,
some bellhousing bolts, horn, thermostat housing, cambelt cover (which I may or may not use) and
more hoses than you can shake a stick at. Bought a new clutch release arm boot & clip from the
dealer too - I don't want oil and dirt getting into the bellhousing once it's all together.
That's better. Starting the week well - got the diff apart thanks to a crowbar and lump hammer. Not as drastic as it sounds, only took a couple of gentle taps to pull the thing out. The crown wheel came straight off, unlike the bearings (not surprising - I don't really have any tools suitable for pulling bearings off). I need the shims which are behind the bearings, but since I can't get at these ones I've got to get new ones. No great hardship, just another day to wait. They were both 0.5mm according to my vernier calipers. I believe this may change between diffs though, so it's worth checking.... When they arrive, it should just be a matter of driving the new bearings and shims into place then bolting back together. With the axle back in, hopefully I can finally get the thing on its wheels soon....
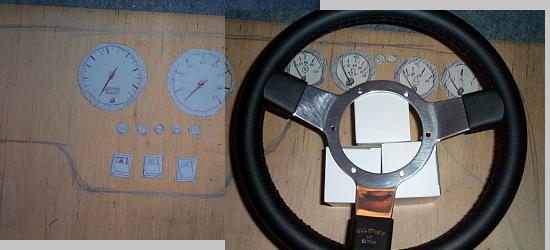
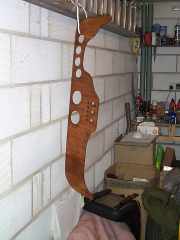
 I've spent an evening trying out dash layouts, and come up with something that I like. It's not
particularly original, but works very well I think. Before I began, I'd decided that I was going to
reshape the dash a little, so I started off with a 1220x600mm piece of 3-ply 6mm board, with the
outline of the Tiger-supplied dash panel drawn on. This board is a bit thicker than Tiger's, but my
changes will need it to have more strength as some of it will be unsupported. It's big enough to give
me plenty of spare wood for the other bits I want to make up....
I've spent an evening trying out dash layouts, and come up with something that I like. It's not
particularly original, but works very well I think. Before I began, I'd decided that I was going to
reshape the dash a little, so I started off with a 1220x600mm piece of 3-ply 6mm board, with the
outline of the Tiger-supplied dash panel drawn on. This board is a bit thicker than Tiger's, but my
changes will need it to have more strength as some of it will be unsupported. It's big enough to give
me plenty of spare wood for the other bits I want to make up....
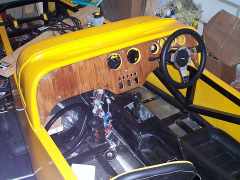
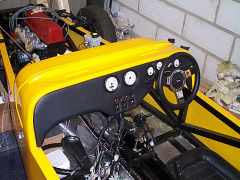
I made life-size copies of my dials, warning lights and switches on the back of a cornflakes packet and started shuffling them round. I've extended the dash downwards over the transmission tunnel area, which looks better and gives more room to fit the speedo, tacho, most lights and switches in the central area without looking cramped. This way, they're all within easy reach/sight of the driver. The four small dials behind the wheel look like they'll be visible, but I'll have to cut the dash panel out and fit it to the car before I can tell for sure.
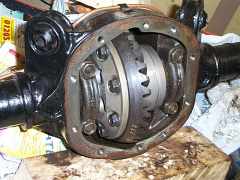
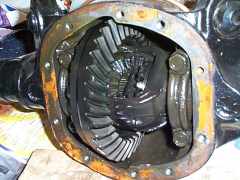
 Built up the diff, as you can see. With the shims in place the bearings went on easily enough, with the
aid of a little grease, a 32mm socket and a little tapping with a hammer. It feels fine bolted back in
place, so sealed the diff up and bolted the axle back in place. Halfshafts back in, refill with EP90
and we're away again. Another coat of underseal on the floor, a touch up to the paint here and there.
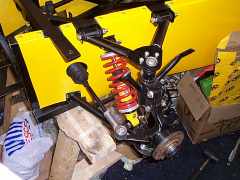
Front suspension back on one side and all torqued up. Once the other side's on, unless I think of
something else which needs doing, it'll be time to sit her on her wheels for the first time....
Built up the diff, as you can see. With the shims in place the bearings went on easily enough, with the
aid of a little grease, a 32mm socket and a little tapping with a hammer. It feels fine bolted back in
place, so sealed the diff up and bolted the axle back in place. Halfshafts back in, refill with EP90
and we're away again. Another coat of underseal on the floor, a touch up to the paint here and there.
Front suspension back on one side and all torqued up. Once the other side's on, unless I think of
something else which needs doing, it'll be time to sit her on her wheels for the first time....
 The other side went straight on, tidied the garage up and we're all ready. I was getting some help
later in the week to help lift the car off the trestles (3ft or so high, remember) but went out there
and felt the weight of each end of the chassis. Thought, "well, I can lift it, surely I can put it
down". So Sam pulled the trestles out, and I lowered the thing to the ground. DON'T TRY THIS AT HOME,
KIDS!!! Wow! Each end's probably at least twice my weight. But she's on the ground now, looking
*incredibly* low, lower than I remembered. And she'll sit a little lower with the weight of the engine
and box in. I should be sorting the box out this week, and probably bolting the engine up to it. You
never know, I might even get round to putting them in sometime in the next week....
The other side went straight on, tidied the garage up and we're all ready. I was getting some help
later in the week to help lift the car off the trestles (3ft or so high, remember) but went out there
and felt the weight of each end of the chassis. Thought, "well, I can lift it, surely I can put it
down". So Sam pulled the trestles out, and I lowered the thing to the ground. DON'T TRY THIS AT HOME,
KIDS!!! Wow! Each end's probably at least twice my weight. But she's on the ground now, looking
*incredibly* low, lower than I remembered. And she'll sit a little lower with the weight of the engine
and box in. I should be sorting the box out this week, and probably bolting the engine up to it. You
never know, I might even get round to putting them in sometime in the next week....
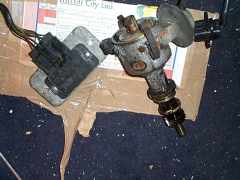
The beemer's back on the road (again) after some work on the brakes, so a bit more time in the next couple of weeks. Spent the weekend (after the beemer was fixed) cleaning up the gearbox among other things. Tapped the plate off the end of gearbox tailhousing, and levered the reverse stop out with a 1/2" extension bar. Had a look inside the top cover - lots of shiny cogs and levers.... :-) All seems to look good to my (extremely untrained) eye. Took the bellhousing off, cleaned and painted it. Also removed the release bearing from the arm, as I'm going to put a new one in instead. It's such a little thing, but they don't like being sat around muddy scrapyards unused for months on end, and it's a lot of grief to change it later. They whine and groan like anything when they go - most embarrassing.
 Also made a proper start on the dash. Drew out the shape I want accurately, and the positions of
the dials, lights and switches. Attacked it with a jigsaw, cutting out the main piece, then using it
to chop holes for the instruments. The warning light holes were drilled and filed out to the right
size. The whole lot's been smothered in varnish to try and prevent the rot that Neil's dash suffered.
While I was covered in teak-effect goo, I did the same to the interior side panels and the exposed wood
of the seat pads. I'll finish the dash in the next week, and hopefully get the engine & box ready to
go in for the weekend....
Also made a proper start on the dash. Drew out the shape I want accurately, and the positions of
the dials, lights and switches. Attacked it with a jigsaw, cutting out the main piece, then using it
to chop holes for the instruments. The warning light holes were drilled and filed out to the right
size. The whole lot's been smothered in varnish to try and prevent the rot that Neil's dash suffered.
While I was covered in teak-effect goo, I did the same to the interior side panels and the exposed wood
of the seat pads. I'll finish the dash in the next week, and hopefully get the engine & box ready to
go in for the weekend....
The varnish has taken a while to dry, but I've got the foam ('133' 1/4" ultra-low density stuff from Woolies) and the vinyl sheet from Tiger cut down to the right size and shape. Got to grind the heads down on some bolts, which will be used to mount the panel to the scuttle. I'll drill holes through the panel, Araldite the bolts on from the front coming out of the back, drill holes through the scuttle to match and put nuts on the exposed ends of the bolts to secure it all. Got to cut those holes in the scuttle for the instruments to poke through too. The engine hoist is booked for the weekend, so the engine and box will go in then..... excitement.... ;-)
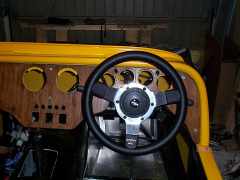
Neil ever-so-kindly chopped most of the head off 8 x M6x20mm bolts for me, which are now perfect for mounting the dash. With the bare panel taped onto the scuttle, I drew the positions of the holes for gauges, lights and switches onto the scuttle, then using Neil's hole saws chopped the majority of GRP out for the dials. The trusty coping saw assisted with removing most of the extra material around the 80mm dials and some filing will be required to finish the job off. The panel was then taped back in place, and I drilled 8 x 6mm holes through both the panel and scuttle for the securing bolts. Positions: central top & bottom, top left & top right, extreme bottom left & right of dash (which pull the panel into the slight curve of the scuttle), and one each side on the bottom of the dash at the top of the curve at each end (if that makes sense....)
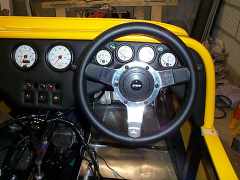
So with with all bolted down, tape removed, put it in the car (which currently has the Mountney wheel, tunnel top, remote gearstick etc fitted) to see how it looks and whether my plan worked.... And it did. Very well indeed. I like... The four dials which are really close together behind the wheel are all completely visible from the drivers seat (even for ickle Sam...) and the indicator stalk doesn't obscure the tacho like it almost did in an early design.....
I've countersunk the holes in the panel a little, using a 10mm wood drill - more useful than a general HSS bit, because the wood bit cuts on the edge first, whereas an HSS bit is tapered and won't give a flat for the bolt to sit on. I also filed the heads of the bolts a little to neaten them and round the edges a touch. Dug out the old Araldite and stuck 'em in place, and they seem to have help well. They're not quite flush, but almost, and it'll look good when the dash is trimmed. Going to concentrate on getting the engine & box ready for the weekend now though - back to the dash next week, probably....
 Took a bit of effort to get the gearbox attached to the engine, as the clutch plate wasn't aligned
with the hole in the end of the crankshaft (and spigot bearing). After useful hints from the
Tiger list it all went together smoothly. The
method was: loosen the clutch cover bolts so the plate can move reasonably well, push the gearbox into
place to centre the plate making sure it goes all the way into the spigot bearing, remove the gearbox
carefully so as not to move the plate, then tighten the cover bolts and refit the box. Lovely.....
Took a bit of effort to get the gearbox attached to the engine, as the clutch plate wasn't aligned
with the hole in the end of the crankshaft (and spigot bearing). After useful hints from the
Tiger list it all went together smoothly. The
method was: loosen the clutch cover bolts so the plate can move reasonably well, push the gearbox into
place to centre the plate making sure it goes all the way into the spigot bearing, remove the gearbox
carefully so as not to move the plate, then tighten the cover bolts and refit the box. Lovely.....
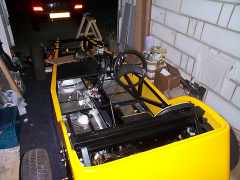
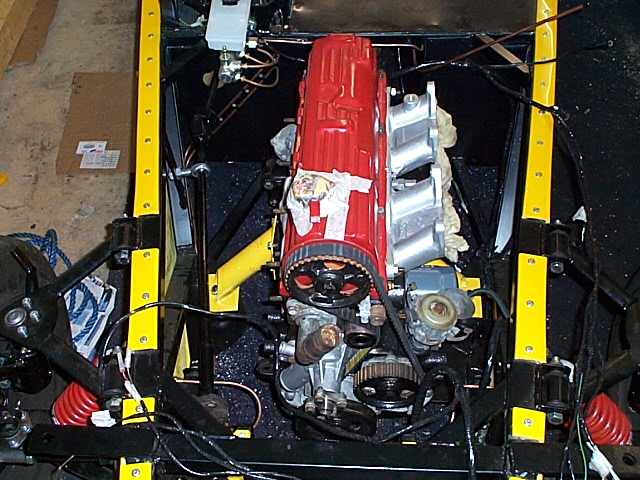
After it was all together, it was just a matter of dropping the box into place (which really does involve dangling the engine and gearbox off a hoist at 45 degrees to the ground!). Marked the positions for the holes for the gearbox mount on top of the chassis mounting members, then transferred them underneath so I could drill them. Whipped the engine back out, then discovered that my mains drill was too large to fit under the car, with it up as high as it would go, so had to nip off and buy the cordless one I've been looking for an excuse to get..... Took ages to charge enough to drill both holes, but got there in the end. Engine back in, gearbox bolted in, metal mounts attached to the engine and down onto a couple of blocks of wood. Drill through passenger side one okay, steering shaft's in the way on the drivers side. So marked the position on top of the chassis plate, transferred it underneath and drilled upwards. Replaced the blocks with the rubber mounts and bolted it down. Et voila! One engine and gearbox mounted. Including tidying the garage, getting the hoist, making breakfast, charging battery for drill and chatting to just about everyone who lives in our road, about 6 hours....
Fitted the gear remote, nice and easy. Need to adjust the reverse stop a bit, but I'll do that once I've got a clutch so putting it in and out of gear isn't so tricky. Got the right bolts for thepropshaft to diff input flange too. Ford dealer found the right ones eventually (part no 6118334). They're high tensile (10.9), pre-threadlocked 10mm, but a fine thread so I didn't have anything to match. (ah, they're possibly 3/8 UNF, but I don't have any imperial stuff lying around...)
 Painted up lots of bits, including the water pump pulley I got on a rather successful scrapyard visit.
Along with the Cortina crankcase breather, axle breather, dipstick, etc. The rest of the week was taken
up finishing off the dash and fitting it, and sorting out wiring. I now have all the connections ready
to go onto all the instruments, including the multi-plugs for the tacho and speedo. I was briefly
confused over the starter motor connections, as the loom's got two wires (one without connector) and
the motor's got 3 terminals. Figured it out eventually though, the solenoid trigger line goes onto
terminal 50 and the other one (terminal 15a I think) is unused here. I guess we'll find out when I try
and start it....
Painted up lots of bits, including the water pump pulley I got on a rather successful scrapyard visit.
Along with the Cortina crankcase breather, axle breather, dipstick, etc. The rest of the week was taken
up finishing off the dash and fitting it, and sorting out wiring. I now have all the connections ready
to go onto all the instruments, including the multi-plugs for the tacho and speedo. I was briefly
confused over the starter motor connections, as the loom's got two wires (one without connector) and
the motor's got 3 terminals. Figured it out eventually though, the solenoid trigger line goes onto
terminal 50 and the other one (terminal 15a I think) is unused here. I guess we'll find out when I try
and start it....
 Work to come includes making some bracketry for a radiator fan, since I don't fancy masticking a fan
and cowling onto the front of the radiator. Rewiring the alternator since I don't like the multi-plug
type that Tiger use so I've got one with ring terminals on (the old reliable way....). Fitting the
front end of the fuel system (filter/pressure regulator and hosing). Then once I've got an RS sump I'll
drill it to fit the oil temperature sensor, wire it in and that'll be it (assuming Parcel Farce ever get
round to delivering the carbs they've had for days now.....)
Work to come includes making some bracketry for a radiator fan, since I don't fancy masticking a fan
and cowling onto the front of the radiator. Rewiring the alternator since I don't like the multi-plug
type that Tiger use so I've got one with ring terminals on (the old reliable way....). Fitting the
front end of the fuel system (filter/pressure regulator and hosing). Then once I've got an RS sump I'll
drill it to fit the oil temperature sensor, wire it in and that'll be it (assuming Parcel Farce ever get
round to delivering the carbs they've had for days now.....)