February 2001
Week 39
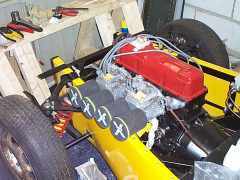 The carbs did arrive, 9 days later (bl**dy ParcelFarce). And very good they look too, Dell'Orto DHLA45's
with 38mm chokes, 170 air correctors, 150 mains, 7772.6 emulsions, 50/7850.1 idles. Or, in somewhat more
understandableterms, a pretty good starting position for a 2l Pinto with some tuning.... Not much else
happening this week, other stuff to do.
The carbs did arrive, 9 days later (bl**dy ParcelFarce). And very good they look too, Dell'Orto DHLA45's
with 38mm chokes, 170 air correctors, 150 mains, 7772.6 emulsions, 50/7850.1 idles. Or, in somewhat more
understandableterms, a pretty good starting position for a 2l Pinto with some tuning.... Not much else
happening this week, other stuff to do.
Spent the weekend helping Ian Martin pull the sick engine out of his Cat and drop it off at
Patterson's for a rebuild. Was also present when Neil suddenly decided he wanted a Zetec (when
presented with an 1800 mile one complete for 500 quid....). Then we went out and had beer.
Week 40

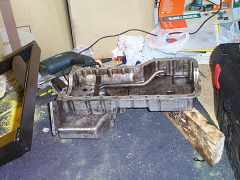 Got an RS2000 cast aluminium sump from a motorsport dealer in the back of Motoring News. It's
complete, with the baffle plate, pickup and a set of bolts. If you ask me, it's heavier than the
cut'n'shut Tiger tin affair.... just as well I bought it just to avoid a welded one, not to save
weight...
Got an RS2000 cast aluminium sump from a motorsport dealer in the back of Motoring News. It's
complete, with the baffle plate, pickup and a set of bolts. If you ask me, it's heavier than the
cut'n'shut Tiger tin affair.... just as well I bought it just to avoid a welded one, not to save
weight...
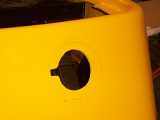
 Also cut the holes in the tub to fit the fuel filler on the rear end. A long time ago I chopped
an inch or so off the inlet pipe on the tank to ensure the filler neck and tank inlet lined up well
enough, and I had to take ¾" off the breather connection on the filler neck to get it onto
the tub neatly. Six M6x25 countersunk bolts later and Bob's yer uncle....
Also cut the holes in the tub to fit the fuel filler on the rear end. A long time ago I chopped
an inch or so off the inlet pipe on the tank to ensure the filler neck and tank inlet lined up well
enough, and I had to take ¾" off the breather connection on the filler neck to get it onto
the tub neatly. Six M6x25 countersunk bolts later and Bob's yer uncle....
Week 41
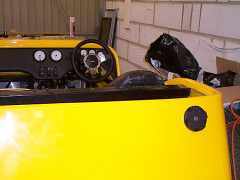
 Not much time for car work. Finished off the fuel filler, connected up the filler pipe and the
breather pipe between tank and filler neck, and finally secured it all. The biggest job I managed
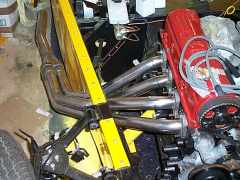
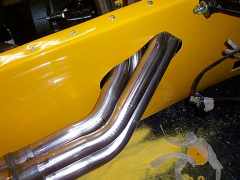
was definitely fitting the exhaust header pipes. This involves cutting a great big hole in the
tub in the engine bay on the driver's side, in order to poke the pipes through, but without making
the hole too large. Needless to say, it took absolutely ages to get reasonable, but it's not too
bad in the end. Advice for other Six builders, ignore both the template in the old manual and the
marks on the tub suggesting where to cut. They were up to 3 inches out on mine, and completely the
wrong shape. Cut a big hole (I used a 64mm hole saw) roughly central to where it's going to go,
then put each pipe through the hole in turn and file the hole out in the direction it needs to go
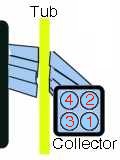
to make the flange sit flat on the engine. In case you're wondering (as I did) the position of the
individual pipes in the 4-1 collector are as shown on the diagram to the right, which is shown
looking from the rear of the car towards the front. The cylinders are numbered 1 from the cambelt
end of the engine, in case you wondered.
Not much time for car work. Finished off the fuel filler, connected up the filler pipe and the
breather pipe between tank and filler neck, and finally secured it all. The biggest job I managed
was definitely fitting the exhaust header pipes. This involves cutting a great big hole in the
tub in the engine bay on the driver's side, in order to poke the pipes through, but without making
the hole too large. Needless to say, it took absolutely ages to get reasonable, but it's not too
bad in the end. Advice for other Six builders, ignore both the template in the old manual and the
marks on the tub suggesting where to cut. They were up to 3 inches out on mine, and completely the
wrong shape. Cut a big hole (I used a 64mm hole saw) roughly central to where it's going to go,
then put each pipe through the hole in turn and file the hole out in the direction it needs to go
to make the flange sit flat on the engine. In case you're wondering (as I did) the position of the
individual pipes in the 4-1 collector are as shown on the diagram to the right, which is shown
looking from the rear of the car towards the front. The cylinders are numbered 1 from the cambelt
end of the engine, in case you wondered.
Week 42
Getting into the remaining wiring now. Spent a couple of evenings tying down all the wires in the
tunnel, and making sure everything's well wrapped. The wiring in the engine bay's mostly sorted now.
I've made a mini-loom for the coil, dizzy and amp module, which are now joined onto the main loom
ready to be connected up. Just need to bolt down the coil and amp. The wiring takes an interesting
route around the side of the engine bay under the carbs. There are separate paths for the main part
of the loom including the starter wiring and connections to the front (e.g. fan and lights) and the
wiring for the ignition system and pressure/temperature sensors. The main loom dips down by the
starter and back up towards the front, where the ignition wiring runs along the top rail. It sounds
messy, but it's actually really tidy (though I say so myself) and makes the best use of the available
space. The loom's not too bad for wire lengths. The odd piece is a foot too long, but only found
one bit too short so far (which is much more of a pain).
Also mounted the final fuel filter and regulator up front ready to be connected up to the
carbs. Just need to borrow a pipe cutter to shorten the main fuel line then I'll hook the inlet up
and get the carbs on.